DaVinci Notes App : Using the Idea Mapper
 Idea Maps: Brainstorming and Refining Your Ideas
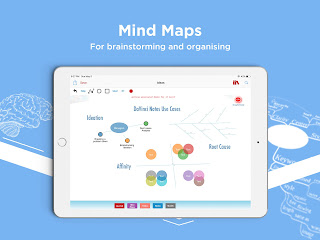
Idea Maps are essentially Mind Maps with a bit more flexibility for brainstorming and refining ideas. Unlike "pure" mind-mapping solutions - you do not need a strict hierarchy with a single root. We also allow a free-form draw operation.
Here are some notes to help you use the Idea Map module in DaVinci Notes:
When are Idea Maps more useful than sketches or lists?
Idea Maps are more useful than sketches or lists when you are brainstorming , planning content , trying to understand root causes for problems or trying to get a better understand the relationships of various elements underlying a concept or issue. The main reason Idea Maps are better than lists or sketches is that they allow you to rearrange and reposition nodes and connected links at will - to better see the whole picture.
Rearranging is not always easy to do with a sketch or a whiteboard -as it often requires a lot erasing and rewriting.
Idea-Maps also tend to be much neater. Neatness always aids understanding.
Saving, Sharing and Posting Idea Maps
Always remember to hit SAVE after any edits to the Idea-Map. The first time you will have to give the saved map a title.
 A List of saved maps can be viewed by tapping the button with the books icon.
You can Post an Idea-Map to the Journal - where a screen shot will be used in the post.
On clicking the screen shot in the journal, it will retrieve and show you an editable Idea-Map.
You can also share via email, posting the screen shot to social media or saving it in your photo album. The posted screen shot is an image and is not editable.
Idea-Maps also tend to be much neater. Neatness always aids understanding.
Saving, Sharing and Posting Idea Maps
Always remember to hit SAVE after any edits to the Idea-Map. The first time you will have to give the saved map a title.
 A List of saved maps can be viewed by tapping the button with the books icon.
You can Post an Idea-Map to the Journal - where a screen shot will be used in the post.
On clicking the screen shot in the journal, it will retrieve and show you an editable Idea-Map.
You can also share via email, posting the screen shot to social media or saving it in your photo album. The posted screen shot is an image and is not editable.
 Nodes are Circles , TextBoxes ,Headings or Labels. You Add them by using the appropriate button in the top menu bar.
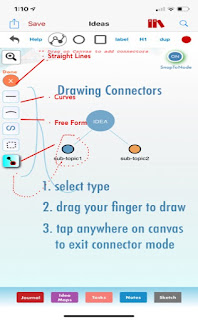
Connectors are all drawn by dragging. You need to set the connector mode by pressing the connector button in the top bar and then drag your finger from point A to pointB
Labelled Connectors can have a text label that attaches to
the connector.
the connector.
Labelled Connectors are : Straight Lines , Curves or a Connector with ChildNode. You just drag from Point A to Point B and you have your connector.
The child node connector was included to make mind-mapping fast and easy. It is also a labelled connector,
- A free form connector - that can also be a closed shape
- A rectangular grouping connector.
How to Style Connectors
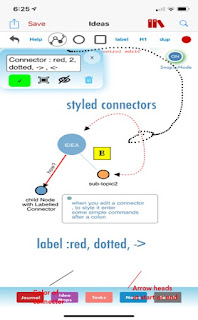
 While we do have color pick lists - you can also style connectors by adding a command following the text label. The commands are simple and enable you to style your connectors quickly:
Here is a quick cheat sheet:
dashed,green will give you a dashed green connector with the default width of 1px
bg-red will give you a fill(background of red) other bg-xxx color
Connector start and end points can have : arrows , bars or circles.
The commands are
>> : end arrow
<< : start arrow
-o : circle
bar: bar


Comments
Post a Comment